Keycloak Cross Data Center Setup in AWS
January 15 2018 by Hynek Mlnařík
This post is more than one year old. The contents within the blog is likely to be out of date.
Sample Keycloak Cross Data Center Setup in AWS Environment
With Keycloak 3.3.0, the support for large-scale deployment across multiple data centers (also called cross site, X-site, cross data-center, cross-DC) has become available. The natural question arose about how this support can be utilized in cloud environment. This blog post follows up on previous blog post on setting up cross-DC locally, and enhances it with an example of how to setup this type of deployment in Amazon Web Services (AWS).
It is strongly recommended to use version 3.4.3.Final at minimum as there were several important fixes done around cross-DC support since the first cross-DC-capable version.
It is strongly recommended to use version 3.4.3.Final at minimum as there were several important fixes done around cross-DC support since the first cross-DC-capable version.
Architecture
The general architecture of a cross-DC deployment is described in detail in Keycloak documentation and briefly shown in the following diagram. There are several data centers (site1 and site2 in the picture that can be found in full scale in the documentation). The sites have a replicated database, set up ideally in multimaster synchronous replication mode. Each site has a cluster of Keycloak nodes and a cluster of Infinispan nodes. The clusters of Keycloak nodes are hidden behind a load balancer in private subnet; Infinispan nodes form a cluster within corresponding data center, and in addition utilize RELAY protocol to backup each other across data centers.

Example
This post is based on three CloudFormation templates that gradually build two data centers with Keycloak instances, each data center in a separate AWS availability zone sharing the same virtual private cloud (VPC). Note that the templates are intended for trying/testing purposes only, not for production. The templates are described below:
- VPC stack. This stack creates a new VPC with four subnets: two of them in one availability zone, another two in another availability zone. One of the subnet in each availability zone is private, intended for Keycloak instances; the other subnet in each availability zone is intended for load balancer and Infinispan (so that these can communicate over the internet).
The only parameter in this stack is the number B in VPC IP address range 10.B.0.0/16.
Click the button below to launch this stack:
- Database and AMI stack. This stack creates an RDS Aurora MySQL-compatible database instance, builds Keycloak from source, creates S3 buckets necessary for dynamic node discovery via S3_PING protocol, and produces AMI image that contains both Keycloak and Infinispan preconfigured to form appropriate clusters. It relies on AWS Lambda-backed custom resources, so in order to create them, it is required that this template creates a role for these Lambdas. To launch this template, it is hence required that the user grants the CAPABILITY_IAM capability.
Both Keycloak and Infinispan server are prepared just the same way as for running cross-DC tests, and then are placed into /opt/tests path and the relevant part of their configuration is updated to suit AWS deployment.
This template has several parameters, most of them are self-describing:
- VPC stack name: Name of the stack created in the previous step
- Instance type for building image
- Database instance type: Type of the database as available in RDS
- Install diagnostic tools: Flag signalling whether the diagnostic tools should be installed
- URL to Maven repository for build: To speed up build, instead of downloading each Maven artifact, URL with a .zip file containing the whole $HOME/.m2 directory can be provided that would be unpacked prior to the actual build and provide the artifacts, thus speeding the build up.
- Keycloak Git repository and Git tag/branch/commit: Git repository and tag from which the build should start.
Click the button below to launch this stack: - Keycloak deployment stack. This stack creates instantiates one Infinispan node in public subnet per data center, given number of Keycloak servers in private subnet joined in the cluster in each data center, and an AWS Application load balancer to spread the load between the actual Keycloak servers. If not restoring database from backup, it also creates an initial user admin with password admin in master realm, and also configures master realm to permit insecure http access to the admin console (remember, it is only a test instance, don't do this in production!).
This template has several parameters, most of them are self-describing:
- AMI stack name: Name of the stack created in the previous step
- Keycloak instances per data centre: Number of Keycloak nodes per data center
- Instance type for Keycloak servers
- Instance type for Infinispan servers
- SSH key name: Name of EC2 ssh key used for instance initialization
- Load balancer scheme: This settings determines whether the load balancer would be assigned a public or private IP only. See AWS documentation for further information.
- Database backup URL: In case you have a dump of Keycloak MySQL/MariaDB database, you can initialize the database with it by providing URL to that dump. The dump might be optionally gzipped, .gz suffix of that dump is then mandatory.
Click the button below to launch this stack:
Once you launch the last stack, Keycloak will be available at the load balancer address that will be shown in Outputs tab of the third stack under LoadBalancerUrl key.
Connecting to nodes
Since Infinispan nodes are assigned public IPs and the security group is set to permit SSH traffic, you can use standard way to access Infinispan nodes.
Accessing Keycloak nodes is only a bit more complicated since these are spawned in private subnets and can only be accessed via Infinispan nodes. You can either copy the private key to the intermediate Infinispan node and use it from there, or (easier) use SSH agent forwarding as follows:
- On your local host, add your AWS ssh key to agent:
ssh-add /path/to/my/aws_ssh_key - Now ssh to the Infinispan host with ssh adding the ForwardAgent option:
ssh -oForwardAgent=yes \ec2-user@${InfinispanServerDcX.PublicDnsName} - From the Infinispan host, you can now ssh to the Keycloak node:
ssh ec2-user@${KeycloakServerDcX.PrivateDnsName}
Connecting to Infinispan JConsole
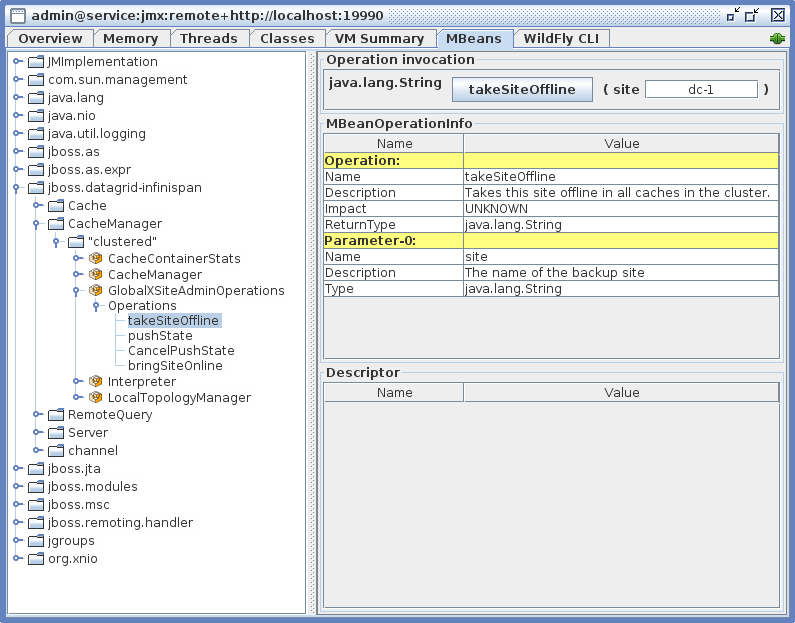
As you would find out from the cross-DC guide, many of the DC-wide operations require running JConsole and invoking operations on Infinispan JMX MBeans. For example, to take a DC offline, one has to first disable backups from the other DCs into the DC about to be shut down, and that is performed by invoking takeSiteOffline operation on CacheManager's GlobalXSiteAdminOperations MBean.
To connect, it is easiest to have a tunnel created to the Infinispan node via SSH command. To simplify the situation a bit, the ssh command for connecting to Infinispan server and creating the tunnel is shown in the Outputs tab of the third stack under SshToInfinispanDcX key, and it takes the following form:
ssh -L 19990:127.0.0.1:9990 \
-oStrictHostKeyChecking=no \
-oUserKnownHostsFile=/dev/null \
-oForwardAgent=yes \
ec2-user@${InfinispanServerDcX.PublicDnsName}
In the command above, the host key checking is effectively disabled as this is only a test run, do not do this in production!
Now it is necessary to add an Infinispan management user so that it is possible to fill in JConsole credentials:
Now it is necessary to add an Infinispan management user so that it is possible to fill in JConsole credentials:
/opt/tests/cache-server-infinispan/bin/add-user.sh -u admin -p pwd
The last thing is to run actual JConsole. Since JConsole does not have support for the service:jmx:remote+http protocol used by both Infinispan and Keycloak, it is necessary to modify JConsole classpath. Fortunately, this work has been already done in WildFly so we can use a script already prepared there. On your local host, extract either WildFly 10+ or Infinispan to path WF_ROOT, and run the following command:
WF_ROOT/bin/jconsole.sh
In the New Connection window, specify Remote Process properties as follows (note that we're using port 19990 on localhost forwarded securely by ssh to actual management port above, this requires the ssh command above to be running for the whole time JConsole is used):
- Remote Process: service:jmx:remote+http://localhost:19990
- Username: admin
- Password: pwd

Now you can connect to the running instance, navigate to any bean you need and perform operations as needed. The backup site names are configured by the AMI stack to values dc-1 and dc-2.
For further details, please inspect the configuration files in /opt/tests/auth-server-wildfly/standalone/configuration/standalone-ha-DC.xml and /opt/tests/cache-server-infinispan/standalone/configuration/clustered-DC.xml.
Disclaimer
This blog has been written at the time Keycloak 3.4.3.Final has been released. There may be incompatible changes in the future but you should still be able to run the templates with this version.
Troubleshooting AWS specifics
- Node discovery in both Keycloak and Infinispan cluster in AWS is handled by S3_PING protocol. This protocol however can operate only in regions that support Version 2 signatures due to this JGroups bug. See Amazon documentation on S3 endpoints for regions that support Version 2 signatures. Note that it might be possible to use new NATIVE_S3_PING protocol but this one has not yet been incorporated into Keycloak due to this WildFly issue. As a workaround, you might be able to use other discovery protocol, e.g. JDBC_PING.
- The recommended database products for cross-DC deployments are only those listed in the documentation (currently Oracle Database 12c RAC and Galera cluster for MariaDB). It is possible to use ones available from Amazon RDS service. The templates from this blog are only ready for MySQL/MariaDB databases.
- It is possible to use Amazon ALB for load balancing when the related target group is set to support Load balancer stickiness. ALB uses proprietary load balancer cookie and ignores routes set in Keycloak cookies, hence adding the route to cookie should be disabled in Keycloak configuration.