Setting Up Keycloak as a Credential Issuer with OpenID4VCI
January 16 2026 by Rodrick Awambeng, Forkim Enjeckayang, Ingrid Kamga, Bertrand Ogen
Before configuring Keycloak, it is helpful to understand its role in decentralized identity ecosystems. As a verifiable credential issuer, Keycloak can issue digitally signed credentials using the OpenID for Verifiable Credential Issuance (OpenID4VCI) protocol, allowing relying parties (also known as verifiers) to independently verify them without contacting the issuer.
Keycloak implements OpenID4VCI, enabling the issuance of verifiable credentials (VCs) as digital proofs of identity or attributes. Configuring this functionality requires consistent setup across the realm, clients, and issuable credentials (client scopes).
For example, consider the following scenario: The Keycloak OAuth SIG team wants to issue verifiable membership credentials to its members, including their name and email, which can later be presented at onsite or virtual events as proof of active membership.
| At the time of writing this blog, Keycloak’s support for OpenID4VCI is still experimental. This guide uses the Keycloak 26.5.0 release. The feature is under active development and is expected to be promoted to preview in the future. |
Introduction to OpenID4VCI & OpenID4VP
OpenID4VCI is a protocol developed by the OpenID Foundation that extends the OAuth 2.0 framework to support the secure and interoperable issuance of Verifiable Credentials (VCs). VCs are digital, tamper-evident representations of information, such as identity attributes or qualifications, which can be cryptographically verified without needing to contact the issuer at verification time.
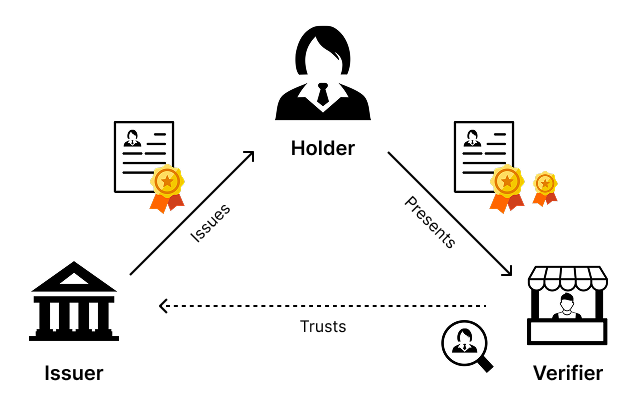
While this guide primarily focuses on OpenID for Verifiable Credential Issuance (OpenID4VCI), the overall trust architecture also includes OpenID for Verifiable Presentations (OpenID4VP), which governs how holders present credentials to verifiers. Together, these protocols enable decentralized identity ecosystems in which users (holders) retain control of their data and can share it selectively with verifiers.
Figure 1. Triangle of trust or Issuer-Holder-Verifier model
In this model:
-
Issuer ↔ Holder interactions are governed by OpenID4VCI, covering credential issuance.
-
Holder ↔ Verifier interactions are governed by OpenID4VP, covering credential presentation and verification.
From a privacy perspective, this separation of concerns is fundamental. By decoupling credential issuance from credential presentation, issuers are unable to track where, when, or how a holder uses their credentials. This architecture prevents correlation and profiling, and ensures that users remain in control of how their data is shared.
Why Use OpenID4VCI
The primary motivations for adopting OpenID4VCI include:
-
Interoperability: Builds on established OpenID Connect (OIDC) standards, simplifying integration with existing identity providers.
-
Privacy and Security: Supports selective disclosure (e.g., proving age without revealing birthdate) and offline verification.
-
Compliance: Aligned with regulations like eIDAS 2.0.
-
Efficiency: Leverages OIDC mechanisms to streamline issuance while maintaining trust in the "triangle of trust" model (Issuer-Holder-Verifier).
Verifiable Credential Formats
OpenID4VCI supports multiple credential formats, which define how verifiable credentials are encoded and issued.
These formats allow issuers to provide portable, verifiable digital proofs that support selective disclosure and offline verification in decentralized identity ecosystems.
Keycloak currently supports both SD-JWT VC and JWT VC for issuance. mDL/mdoc, which is part of the OpenID4VCI specification, is expected to be supported in the future.
Concrete Use-Cases Enabled by OpenID4VCI
Verifiable credentials open a variety of real-world applications. Examples include:
-
Governments or non-government organisations issuing digital identity cards or driver’s licenses that citizens can present when booking hotels, opening bank accounts, or accessing public services, while revealing only the information necessary for the transaction (e.g., age or residency) without exposing full personal details.
-
City councils issuing verifiable birth certificates that universities and hospitals can validate without a central lookup.
-
Universities issuing digital diplomas that employers can instantly verify for authenticity.
-
Companies issuing employee badges as verifiable credentials for office access or remote authentication.
-
Event organizers issuing verifiable tickets that can be validated offline.
-
Professional associations issuing membership credentials such as in our OAuth SIG example for verifying access to gated resources or conference venues.
-
Digital movie or event tickets that are tamper-evident and can be verified offline.
These examples illustrate the variety of situations where verifiable credentials remove the need for direct communication between verifier and issuer while preserving trust.
Key Flows in OpenID4VCI
OpenID4VCI defines two primary flows for credential issuance: the Authorization Code Flow and the Pre-Authorized Code Flow. These flows determine how a wallet (holder’s application) obtains an access token to request a VC from the issuer.
Authorization Code Flow
The Authorization Code Flow is interactive and requires the holder to authenticate and consent at the issuer’s authorization endpoint. It is ideal for scenarios where explicit user approval is required, or additional claims must be collected.
Steps:
-
The Wallet sends an Authorization Request to the Issuer’s Authorization Endpoint, requesting credentials.
-
The Issuer authenticates the User and requests consent for the issuance.
-
The User provides credentials and grants consent.
-
The Issuer returns an Authorization Code to the Wallet.
-
The Wallet exchanges the code at the Issuer Token Endpoint for an Access Token.
-
The Issuer returns the Access Token to the Wallet.
-
The Wallet requests the Verifiable Credential from the Issuer Credential Endpoint using the Access Token.
-
The Issuer returns the VC to the Wallet.
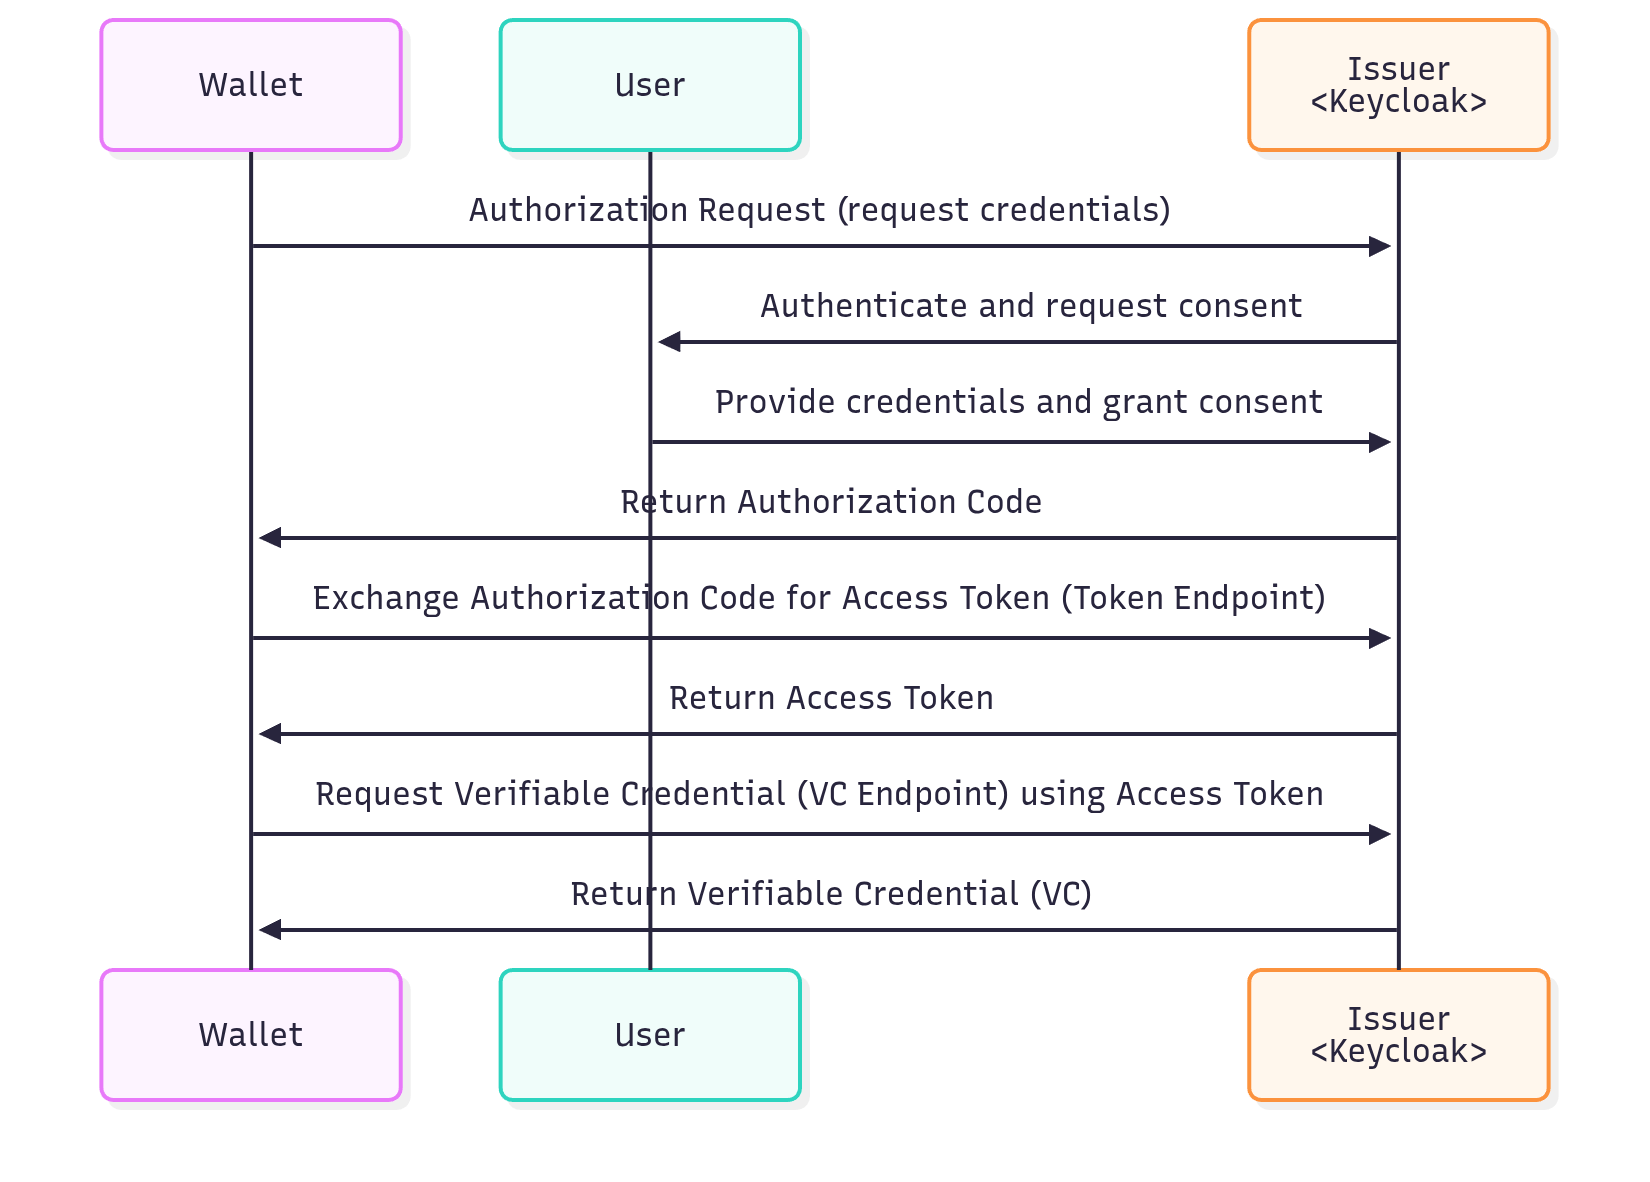
Figure 2. Credential issuance via Authorization Code Flow
Pre-Authorized Code Flow
The Pre-Authorized Code Flow is non-interactive. The issuer pre-authenticates and authorizes the user, providing a pre-authorized code (often via QR code). It is faster and suitable for pre-approved credential issuance.
Steps:
-
The Issuer provides a Pre-Authorized Code to the Wallet (e.g., via QR code or link).
-
The Wallet exchanges the code at the Issuer Token Endpoint for an Access Token.
-
The Issuer returns the Access Token to the Wallet.
-
The Wallet requests the Verifiable Credential from the Issuer Credential Endpoint using the Access Token.
-
The Issuer returns the VC to the Wallet.
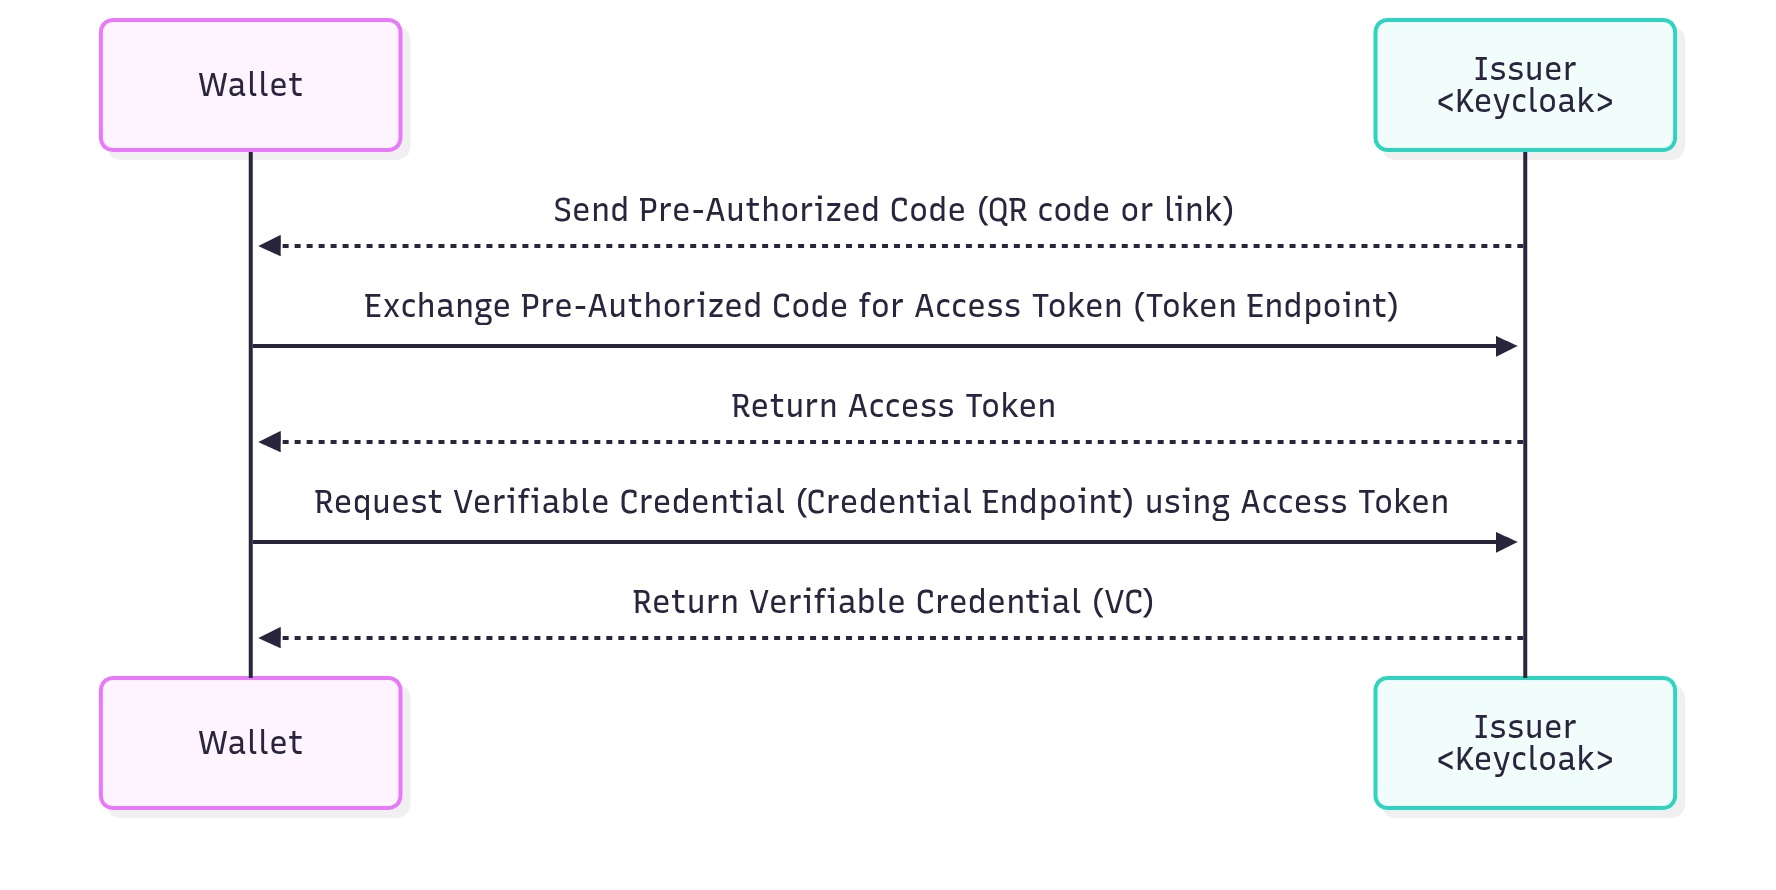
Figure 3. Credential issuance via Pre-Authorized Code Flow
Now that we have covered the technical flows, the rest of this guide walks through configuring Keycloak to issue verifiable credentials using the Pre-Authorized Code Flow, including realm, client scope, and client-level setup.
Configuring Keycloak for OpenID4VCI
OpenID4VCI in Keycloak is offered via the feature flag oid4vc-vci, which consequently needs to be enabled at startup.
--features=oid4vc-vciThat said, we now assume that you have a running Keycloak instance with the oid4vc-vci feature flag enabled.
Beyond enabling the feature flag, the following configuration steps need to be taken consistently, in accordance with your use case:
-
Configure OpenID4VCI at the realm level
-
Configure an issuable verifiable credential (as a dedicated client scope)
-
Enable and configure OpenID4VCI at the client level
Because some configurations are not yet supported via the Keycloak Admin Console, we may often use the Admin REST API to communicate required configurations.
Configuring OpenID4VCI at the realm level
Let’s assume you have already created a realm named oauth-sig-realm to represent the OAuth SIG group, and that a couple of users have also been created in this realm, each with a password assigned, to represent members of the group.
In addition, any user who is intended to create credential offers must be granted the built-in credential-offer-create role. This role is provided by the OpenID4VCI extension and does not need to be created manually. Assigning it ensures that only authorized users can generate credential offers, maintaining the security of the issuance process.
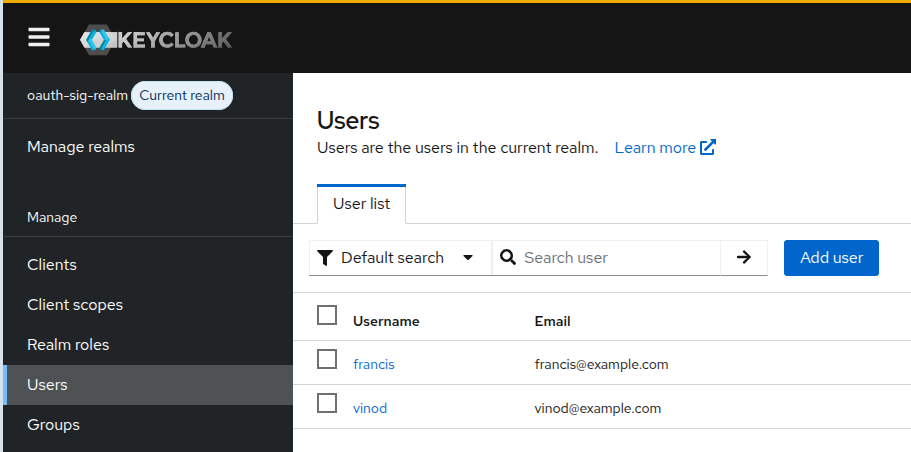
Figure 4. Screenshot: Realm and Users
The behavior of OpenID4VCI across the entire realm can be modulated via realm attributes. On the Admin Console, find the OID4VCI Attributes section under the Realm Settings > Tokens tab.
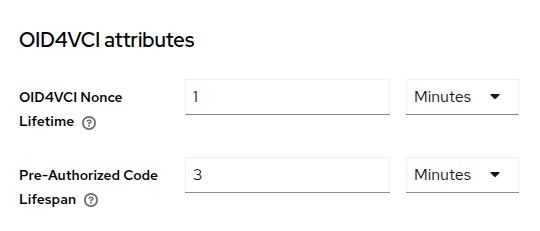
Figure 5. Screenshot: OID4VCI Attributes
Sensible defaults apply out of the box, but for the sake of this demo, we would want, for instance, to increase the value of Pre-Authorized Code Lifespan to 3 minutes so that the issuance flow expires less quickly. To learn more about the Nonce Lifetime and other realm attributes for OpenID4VCI, please refer to the main Keycloak documentation.
Lastly, because EC cryptography is highly encouraged in the OpenID4VC ecosystem, we also invite you to add a P-256 Elliptic Curve key pair to the realm’s set of keys under Realm Settings > Keys > Providers.
This will later enable configuring the signing of issued VCs with algorithm ES256.
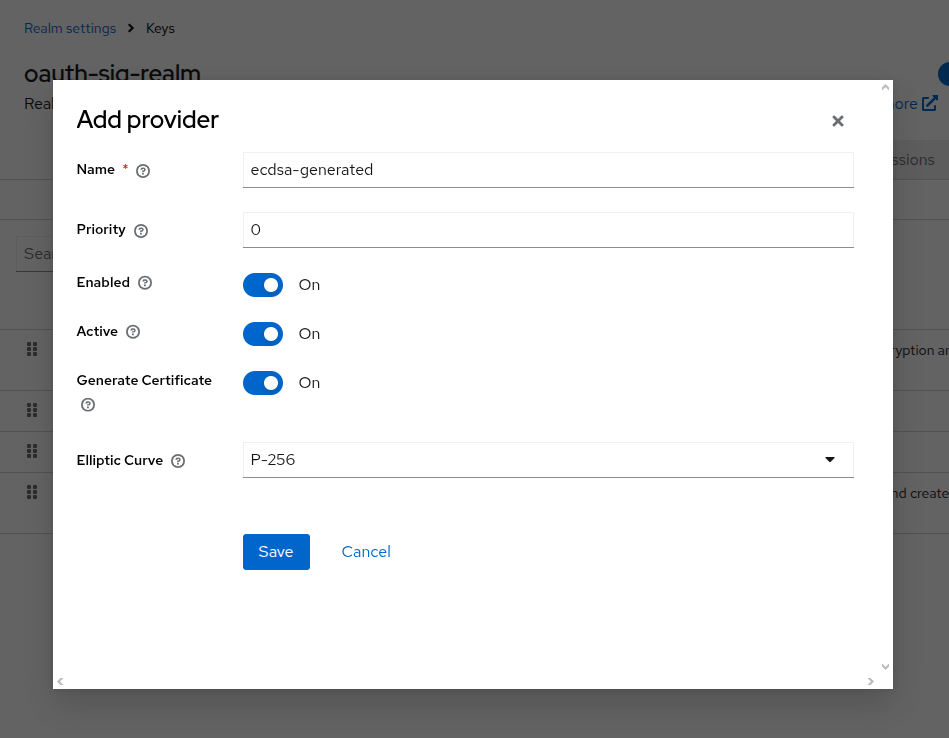
Figure 6. Screenshot: Adding ECDSA Key Provider
Configuring an issuable verifiable credential (as a dedicated client scope)
Different credential types can be configured for issuance depending on what data the credential should embed, what format it should have, or other criteria. Each credential type is configured as a dedicated client scope of protocol type "OpenID for Verifiable Credentials".
We will configure our membership credential to be issued as an SD-JWT credential carrying a user’s first name, last name, and email. Each claim to be added to the credential requires a corresponding protocol mapper from the User Model to the credential. Other fields such as the time of issuance or a unique identifier for the credential are supported via other types of protocol mappers.
Since we will be using the Admin REST API to configure the client scope, we first need to obtain a valid Admin Token from the master realm to authorize our requests.
ADMIN_TOKEN=$(curl -s -X POST "http://<keycloak.instance>/realms/master/protocol/openid-connect/token" \
  -H "Content-Type: application/x-www-form-urlencoded" \
  -d "username=<admin-username>" \
  -d "password=<admin-password>" \
  -d "grant_type=password" \
  -d "client_id=admin-cli" | jq -r '.access_token' )
echo "Admin Token obtained: $ADMIN_TOKEN"
Now, let’s proceed with adding the membership credential type as a dedicated client scope using the Admin REST API.
curl -X POST "http://<keycloak.instance>/admin/realms/oauth-sig-realm/client-scopes" \
  -H "Content-Type: application/json" \
  -H "Authorization: Bearer $ADMIN_TOKEN" \
  -d '{
    "name": "membership-credential",
    "protocol": "oid4vc",
    "attributes": {
      "include.in.token.scope": "true",
      "vc.format": "dc+sd-jwt",
      "vc.verifiable_credential_type": "https://credentials.example.com/oauth-sig-membership",
      "vc.credential_signing_alg": "ES256",
      "vc.display": "[{\"name\": \"OAuth SIG Membership\", \"locale\":\"en\"}]",
      "vc.credential_build_config.token_jws_type": "dc+sd-jwt"
    },
    "protocolMappers": [
      {
        "name": "given_name-mapper",
        "protocol": "oid4vc",
        "protocolMapper": "oid4vc-user-attribute-mapper",
        "config": {
          "claim.name": "given_name",
          "userAttribute": "firstName",
          "vc.display": "[{\"name\":\"Given Name\",\"locale\":\"en\"}]"
        }
      },
      {
        "name": "family_name-mapper",
        "protocol": "oid4vc",
        "protocolMapper": "oid4vc-user-attribute-mapper",
        "config": {
          "claim.name": "family_name",
          "userAttribute": "lastName",
          "vc.display": "[{\"name\":\"Family Name\",\"locale\":\"en\"}]"
        }
      },
      {
        "name": "email-mapper",
        "protocol": "oid4vc",
        "protocolMapper": "oid4vc-user-attribute-mapper",
        "config": {
          "claim.name": "email",
          "userAttribute": "email",
          "vc.display": "[{\"name\":\"Email\",\"locale\":\"en\"}]"
        }
      },
      {
        "name": "iat-mapper",
        "protocol": "oid4vc",
        "protocolMapper": "oid4vc-issued-at-time-claim-mapper",
        "config": {
          "claim.name": "iat",
          "truncateToTimeUnit": "HOURS",
          "valueSource": "COMPUTE"
        }
      }
    ]
  }'
Commenting on the above configuration:
-
The
vc.formatattribute defines the credential format (e.g.dc+sd-jwt). -
The
vc.verifiable_credential_typeattribute defines the value of thevctclaim inside the credential. -
The
vc.credential_signing_algattribute specifies the cryptographic algorithm used to sign the credential. -
All
vc.displayentries are intended to be used by a wallet to display intelligible descriptions.
To learn more about other used or available configuration attributes, please refer to the main Keycloak documentation.
Verify that the client scope was created successfully by checking the Admin Console under Client Scopes.
Additionally, check the Credential Issuer Metadata Endpoint by navigating to Realm Settings, toggling the Verifiable Credentials option, and saving the changes. Once done, the endpoint will be listed, allowing you to verify that the newly created credential type appears among the issuable credentials, as shown below.
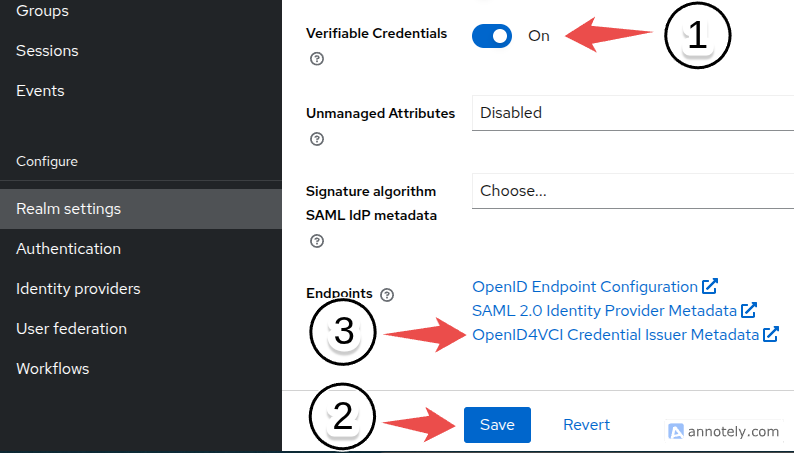
Figure 7. Screenshot: Enable Verifiable Credentials in Realm Settings
The credential type should appear in the metadata like the following:
{
  // ...
  "credential_configurations_supported": {
    "membership-credential": {
      "id": "membership-credential",
      "format": "dc+sd-jwt",
      "scope": "membership-credential",
      "cryptographic_binding_methods_supported": [
        "jwk"
      ],
      "credential_signing_alg_values_supported": [
        "ES256"
      ],
      "vct": "https://credentials.example.com/oauth-sig-membership",
      // ...
    }
  }
  // ...
}
Enabling OpenID4VCI at the client level
Next, let’s create a new client in the oauth-sig-realm realm to represent an application that members of the OAuth SIG will use to request and receive their membership credentials.
We will name this client oauth-sig-client and configure it as a standard OpenID Connect client.
During client creation, make sure to check the Direct Access Grants box, as we will use the Resource Owner Password Credentials flow to obtain a user access token in a later step. All other fields are left unchanged.
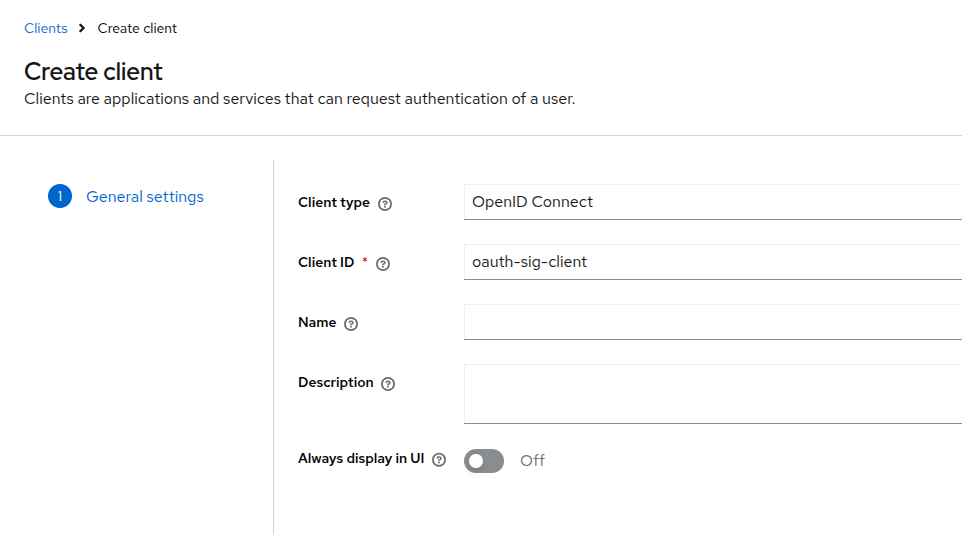
Figure 8. Screenshot: Client Creation
One important point to note is that clients must explicitly enable OpenID4VCI to be able to use it.
Navigate to the Advanced tab of the oauth-sig-client client and toggle the Enable OID4VCI switch under the OpenID for Verifiable Credentials section.
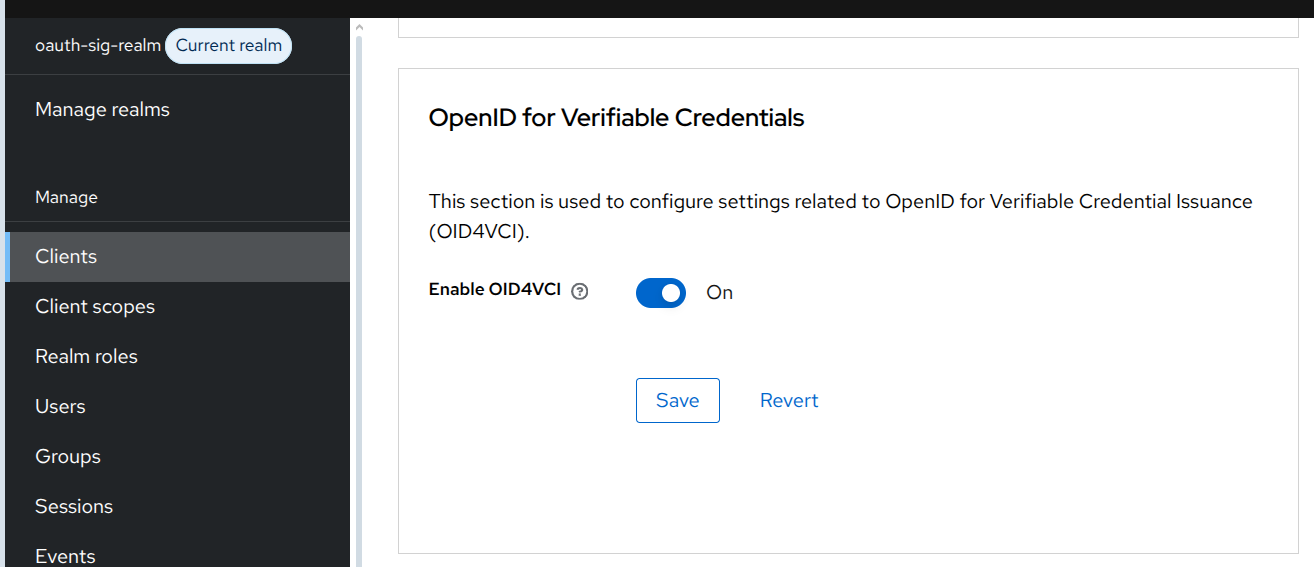
Figure 9. Screenshot: Enable OID4VCI on Client
Finally, we need to assign the previously created membership-credential client scope to the oauth-sig-client client. To do this, navigate to the Client Scopes tab of the oauth-sig-client client and add membership-credential as an Optional Client Scope.
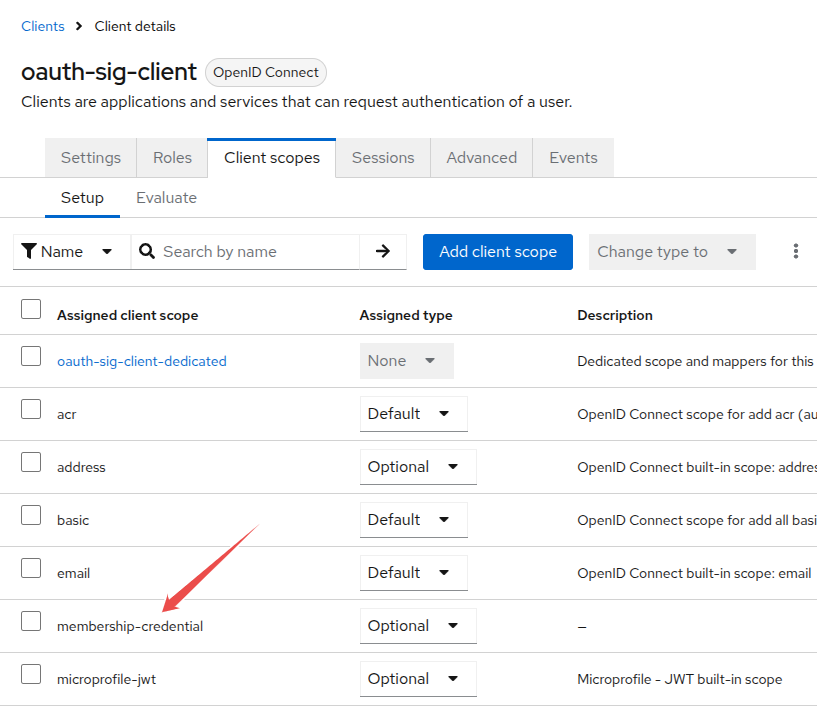
Figure 10. Screenshot: Assigning membership-credential client scope to the client
Obtaining a User Access Token
Before obtaining the user access token, ensure that the user has the credential-offer-create role, as only users with this role can create credential offers.
With the client configured and the user’s password set, we can now request a user access token. This token will later be used to authorize the credential offer request.
USER_TOKEN=$(curl -s -X POST "http://<keycloak.instance>/realms/oauth-sig-realm/protocol/openid-connect/token" \
  -H "Content-Type: application/x-www-form-urlencoded" \
  -d "username=<user-username>" \
  -d "password=<user-password>" \
  -d "grant_type=password" \
  -d "client_id=oauth-sig-client" | jq -r '.access_token' )
echo "User Access Token obtained: $USER_TOKEN"
Now that we have a user access token issued to the user with the credential-offer-create role, we can use it to request a credential offer from the issuer in the next step.
Retrieving a credential offer to start the issuance flow
For Pre-Authorized Code flows, OpenID4VCI issuance can be initiated by retrieving a credential offer from Keycloak at the Credential Offer Endpoint. The endpoint requires a valid user access token and the username of the target user for whom the pre-authorized offer will be generated. In our case, we will be using the same user for both credential offer creation and retrieval.
curl -X GET "http://<keycloak.instance>/realms/oauth-sig-realm/protocol/oid4vc/credential-offer-uri?credential_configuration_id=membership-credential&type=qr-code&username=<username>" \
  -H "Authorization: Bearer $USER_TOKEN" \
  --output credential-offer-qr.png
Replace <username> with the user you created earlier.
The QR code image is saved as credential-offer-qr.png. Open this file and use your wallet to redeem the credential.
|
With the query parameter type=qr-code, the endpoint returns a direct binary representation of the QR code image. If omitted, the endpoint returns JSON, which requires extra steps to construct the QR code from the offer data.
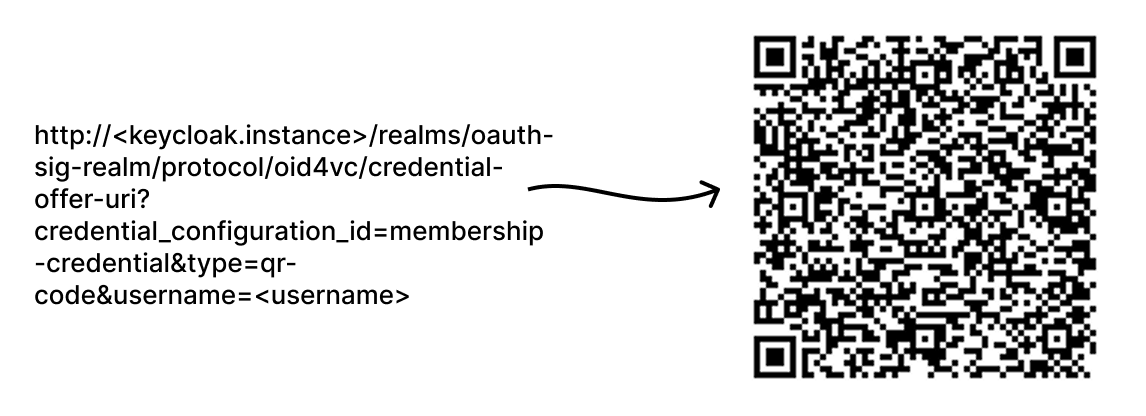
Figure 11. QR Code Generation Overview
Upon scanning the QR code with a compatible wallet, a membership credential is issued to the requesting user.
⚠️ Wallet Compatibility Notice
Keycloak implements the final OpenID4VCI specification and includes a limited Draft-15 compatibility patch with partial support.
Tested Draft-15 wallets that work with the compatibility patch:
| Wallet | Compatibility |
|---|---|
Heidi Wallet |
✅ Works via Draft-15 compatibility patch |
Valera Wallet |
✅ Works via Draft-15 compatibility patch |
Lissi Wallet |
✅ Works via Draft-15 compatibility patch |
| Full support requires wallets providers to implement the final OpenID4VCI specification. |
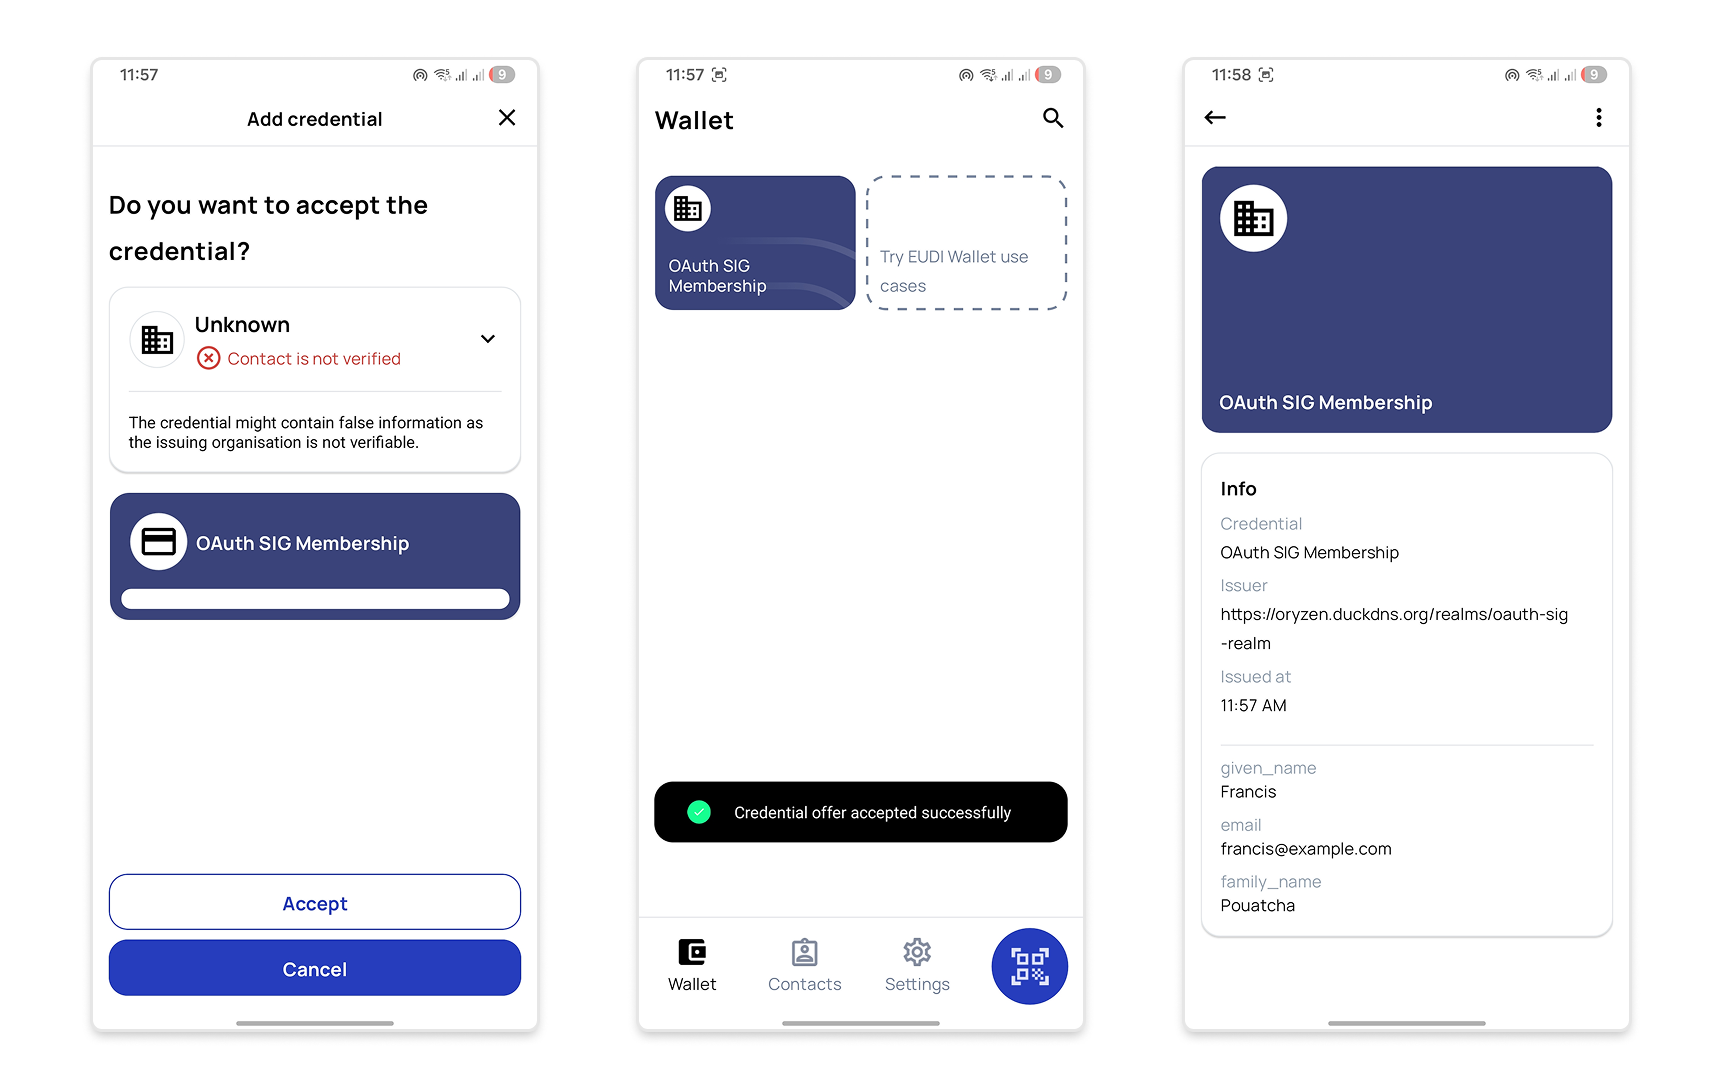
Figure 12. Screenshot: Lissi Wallet Test
Before You Go
In this blog post, we have illustrated how to set up Keycloak for issuing verifiable credentials over OpenID4VCI, using a simple scenario of issuing membership credentials to members of the Keycloak’s OAuth SIG group. We covered the necessary configuration steps at the realm, client scope, and client levels, and demonstrated how to retrieve a credential offer to initiate the issuance flow.
If you are looking into streamlining this configuration process for OpenID4VCI in Keycloak, take a look at our OID4VCI Deployment project, which provides solid examples for both the pre-authorization and authorization code flows. You may also find the Keycloak Playground OID4VCI demo useful as a hands-on demo.
Feedback & Discussion
We’d love to hear your thoughts on this guide! You can provide feedback or ask questions through:
-
Slack: Join the Cloud Native Computing Foundation (CNCF) Slack and discuss with us in the channel #keycloak-oauth-sig.
-
GitHub: Inspect and participate in recent OpenID4VCI-related GitHub discussions. Review existing OpenID4VCI-related GitHub issues and feel free to comment on or upvote them, or create a new issue if you have ideas for enhancements or discover a bug.
Your input will help us to improve the OpenID4VCI experience in Keycloak.
Important Note on OpenID4VCI Development Status
OpenID4VCI support in Keycloak is still under active development. The instructions and configuration options described in this blog post are based on Keycloak 26.5.0 and may change in future Keycloak versions as the feature evolves.
If you want to explore the latest updates to the OID4VCI feature, you can use the latest Keycloak nightly release. However, be aware that the instructions in this blog post may not work with that version.