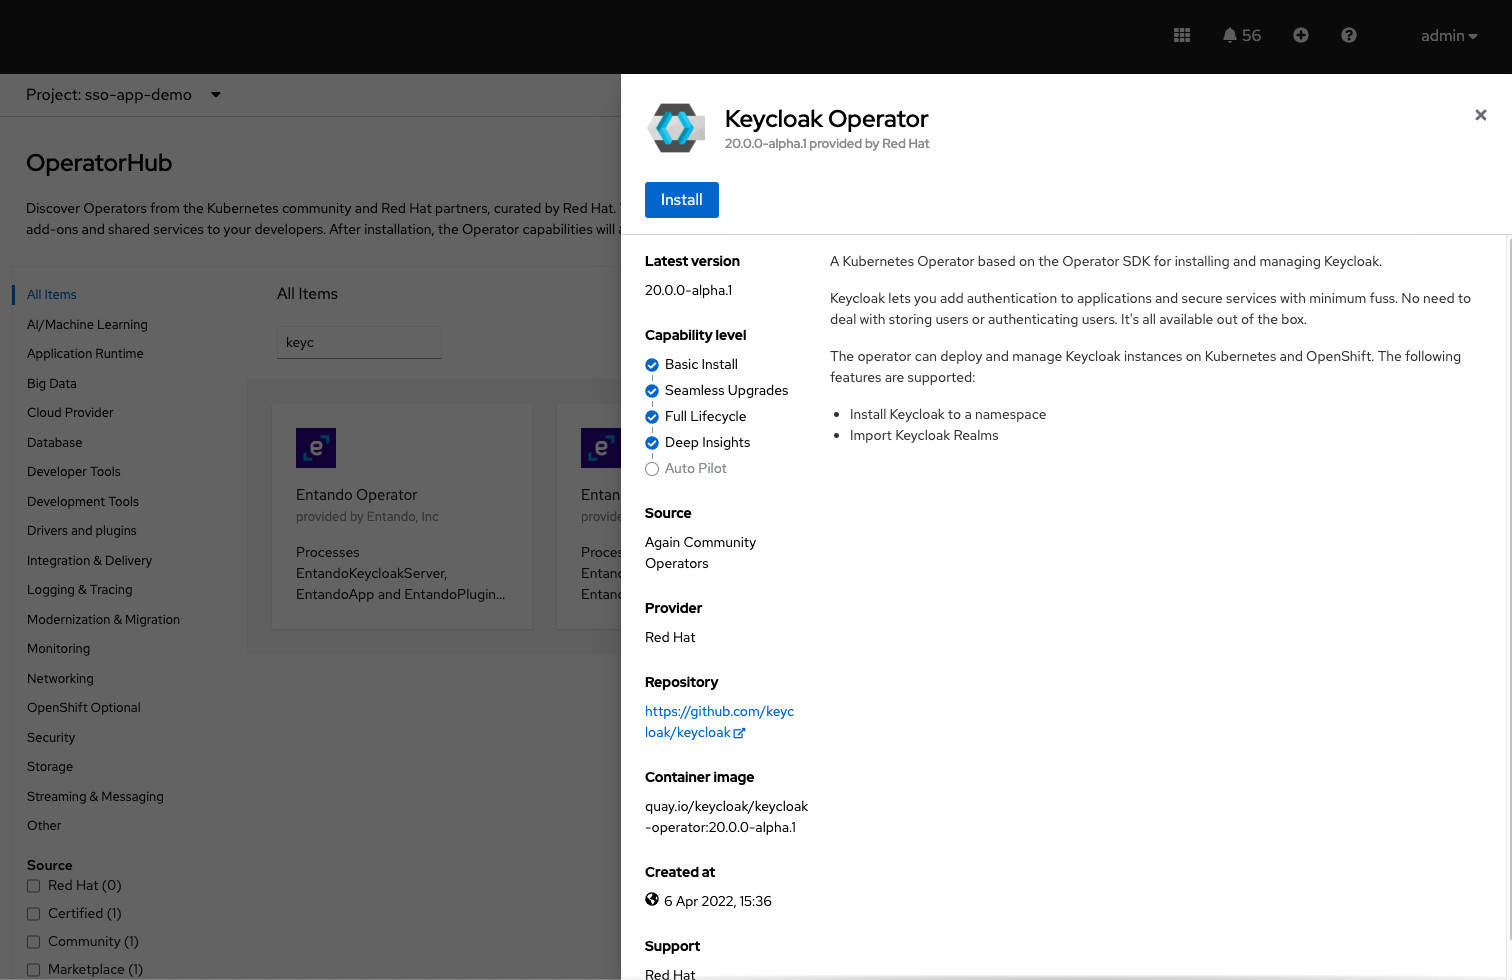
Keycloak Operator Installation
Install the Keycloak Operator on Kubernetes and OpenShift.Installing the Keycloak Operator
This guide describes how to install the Keycloak Operator in a Kubernetes or OpenShift cluster.
Installing by using the Operator Lifecycle Manager
The recommended way to install the Keycloak Operator in Kubernetes environments is to use the Operator Lifecycle Manager (OLM).
Prerequisites
-
Make sure OLM is installed in your environment. For details, see Installing OLM.
-
Be sure that you have cluster-admin permission or an equivalent level of permissions granted by an administrator.
Using the OpenShift web console
The following procedure describes how to install the Keycloak Operator. However, for general instructions on installing Operators using OLM, see Install your operator with OLM. In the default Catalog, the Keycloak Operator is named keycloak-operator. Make sure to use the fast channel to find the operator.
Perform this procedure on an OpenShift cluster.
-
Open the OpenShift Container Platform web console.
-
In the left column, click Home, Operators, OperatorHub.
-
Search for "keycloak" on the search input box.
-
Select the Keycloak Operator from the list of results.
-
Follow the instructions on the screen.
Make sure you are installing from the fast channel:
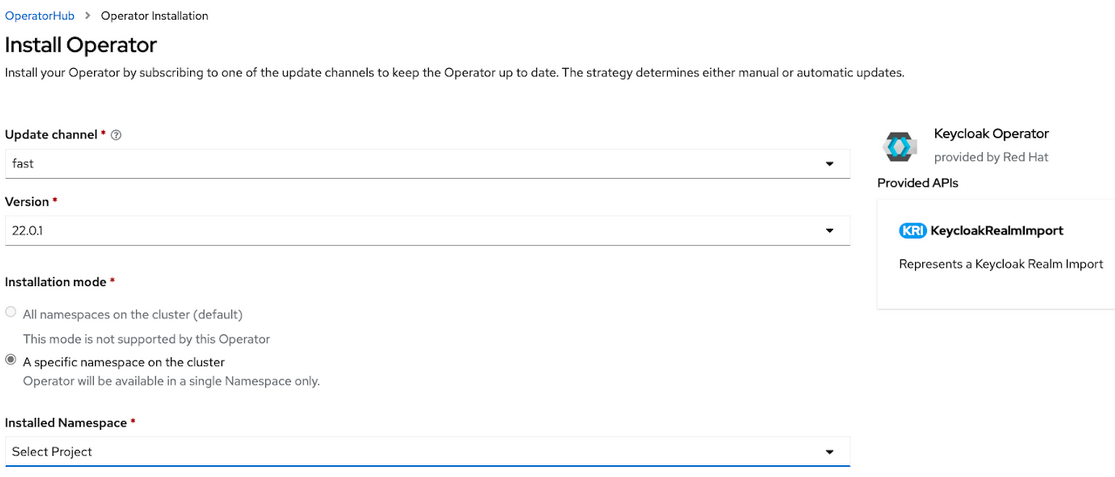
You may select to have the Operator watch the namespace where it is installed, watch a single namespace of your choosing, or watch all namespaces in the cluster.
For cluster-wide installation with OLM, see Cluster-wide installation.
Configuring Manual Approval for OLM Upgrades
|
Important: Automatic OLM Upgrades By default, OLM automatically updates the Keycloak Operator when a new version is released. This can cause several significant issues:
Recommendation: We strongly recommend using manual approval mode for the Keycloak Operator. This ensures you can:
|
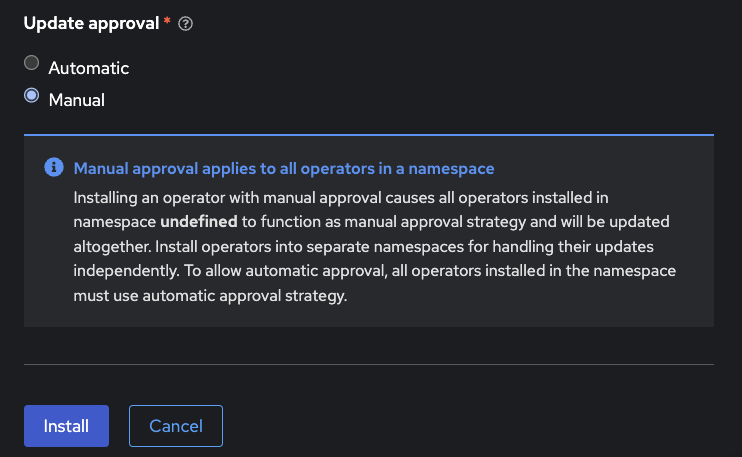
To prevent automatic upgrades by OLM, set the approval strategy to Manual when installing the Operator:
Using the OpenShift web console
When installing the Operator, select Manual approval in the update approval strategy section:
Using the CLI
For command-line installation, create a Subscription with installPlanApproval: Manual:
apiVersion: operators.coreos.com/v1alpha1
kind: Subscription
metadata:
  name: keycloak-operator
  namespace: <target-namespace>
spec:
  channel: fast
  name: keycloak-operator
  source: <catalog-source>
  sourceNamespace: <catalog-namespace>
  installPlanApproval: Manual
After installation, any upgrade will require manual approval through the OLM interface or via the CLI.
Installing by using kubectl without Operator Lifecycle Manager
Install the Keycloak Operator in the keycloak namespace by executing the following commands:
kubectl create namespace keycloak
kubectl apply -k 'github.com/keycloak/keycloak-k8s-resources/kubernetes?ref=26.7.4'
The Operator will watch the namespace where it is installed.
To use a different installation namespace, create an overlay with the desired namespace:
kubectl create namespace custom-namespace

cat <<EOF >./kustomization.yaml
apiVersion: kustomize.config.k8s.io/v1beta1
kind: Kustomization

namespace: custom-namespace

resources:
  - github.com/keycloak/keycloak-k8s-resources/kubernetes?ref=26.7.4
EOF

kubectl apply -k ./
For cluster-wide installation, see Cluster-wide installation.
Cluster-wide installation
A single Keycloak Operator can reconcile custom resources in all namespaces in the cluster. This avoids running one Operator per namespace while still allowing Keycloak instances to be deployed in separate namespaces.
The Operator supports the following OLM install modes (MultiNamespace is not supported):
| Install mode | Operator watches |
|---|---|
|
The namespace where the Operator is installed |
|
One namespace other than the Operator namespace |
|
All namespaces in the cluster |
Install the cluster-wide Operator in a dedicated namespace rather than converting an existing single-namespace installation.
|
Preview support Cluster-wide installation is supported for common scenarios, but it is still considered in preview. |
Limitations
When the Operator watches all namespaces:
-
spec.podTemplate.spec.serviceAccountNamecannot be used on aKeycloakcustom resource. The Operator ignores this field and reports a warning. -
The Operator does not support reconciling multiple Keycloak versions in one cluster. A single Operator version supports a single matching Keycloak version.
-
You need cluster-admin permissions, or equivalent permissions.
Installing with OLM
To install in AllNamespaces mode, subscribe to the Operator and approve the install plan.
We recommend only using manual approval for the install plan.
Using the OpenShift web console
-
Open the OpenShift Container Platform web console.
-
In the left column, click Home, Operators, OperatorHub.
-
Search for "keycloak" and select the Keycloak Operator from the fast channel.
-
On the install screen, select All namespaces on the cluster as the installation mode.
-
Select Manual approval for updates.
-
Complete the installation and approve the install plan when prompted.
-
Verify that the Operator pod is running in the operator namespace.
Using the CLI
Create a global OperatorGroup in the namespace where the Operator is installed by omitting spec.targetNamespaces:
apiVersion: operators.coreos.com/v1
kind: OperatorGroup
metadata:
  name: keycloak-operator-group
  namespace: <operator-namespace>
spec: {}
Create a Subscription with installPlanApproval: Manual:
apiVersion: operators.coreos.com/v1alpha1
kind: Subscription
metadata:
  name: keycloak-operator
  namespace: <operator-namespace>
spec:
  channel: fast
  name: keycloak-operator
  source: <catalog-source>
  sourceNamespace: <catalog-namespace>
  installPlanApproval: Manual
Approve the install plan, then verify that the Operator pod is running.
Installing with kubectl
Install the Operator cluster-wide by using the cluster-wide kustomization:
kubectl create namespace keycloak-operator
kubectl apply -k 'github.com/keycloak/keycloak-k8s-resources/kubernetes/cluster-wide?ref=26.7.4'
This installs the Operator into the keycloak-operator namespace and configures it to watch resources in all namespaces.
To use a different installation namespace, create an overlay with the cluster-wide kustomization:
kubectl create namespace custom-namespace

cat <<EOF >./kustomization.yaml
apiVersion: kustomize.config.k8s.io/v1beta1
kind: Kustomization

namespace: custom-namespace

resources:
  - github.com/keycloak/keycloak-k8s-resources/kubernetes/cluster-wide?ref=26.7.4
EOF

kubectl apply -k ./
You can now create Keycloak custom resources in any namespace. The Operator reconciles resources cluster-wide.
Installing Multiple Operators
In most cases, a single Operator installed in cluster-wide mode is simpler than installing multiple Operators. Install multiple Operators only when you need separate Operator instances, for example to run different Keycloak or Operator versions in parallel.
If you install multiple Operators, please be aware:
-
all Operators share the CRDs (Custom Resource Definitions) as they are installed cluster wide.
-
CRD revisions from newer Operator versions won’t introduce breaking changes except for the eventual removal of fields that have been well deprecated. Thus newer CRDs are generally backward compatible.
-
the CRDs installed last will be the ones in use. This applies to OLM installations as well where the Operator version, that is installed as the last, also installs and overrides the CRDs if they exists in the cluster already.
-
older CRDs may not be forwards compatible with new fields used by newer operators. When using OLM it will check if your custom resources are compatible with the CRDs being installed, so the usage of new fields can prevent the simultaneous installation of older operator versions.
-
when using OLM, newer CRDs containing new API versions (e.g.
v2beta1) will prevent the installation or upgrade of older operators that do not include those versions. -
fields introduced by newer CRDs will not be supported by older Operators. Older operators will fail to handle CRs that use such new fields with an error deserializing an unrecognized field.
It is therefore recommended in a multiple Operator install scenario that you keep versions aligned as closely as possible to minimize the potential problems with different versions.
Upgrading an Operator
While it generally expected that server custom image versions will match the operator version, this can be difficult to properly maintain during an operator upgrade.
The recommended approach is to first update your CRs to custom images utilizing the new version. While the CR configuration will generally be compatible, be aware this may not hold for major version changes, and always consult the upgrade notes for all version changes. Once all the Keycloak instances managed by the operator are updated, then update the operator to the new target version.
If due to a major version change or bug an old operator is not compatible with a new custom image version, then you will instead need to stop the old operator when updating the custom images, then bring up the new operator version once the Keycloak CRs are up-to-date.
To stop an operator you uninstall it, or scale down the Deployment to 0 replicas:
kubectl scale deployment/keycloak-operator --replicas=0See Avoiding downtime with rolling updates to understand how the operator will treat server version changes.
On this page